Install fresh Raspbian image on your Raspberry Pi - part 1
Marco Franssen /
7 min read • 1331 words
In my last blog I shown you how to upgrade from Raspbian Stretch to Raspbian Buster. As the whole upgrade went smooth it seems there are still some issues with Raspbian Buster. The one which blocked me completely was the ability to run Kodi. Kodi was not able to start due to a GUI error. Therefore I decided to switch back to Raspbian Stretch until Raspbian Buster packages catch up.
Prerequisuites
Before you start a fresh install make sure you have an ethernet cable at hand, as we will need it to ssh into our raspberry until we configured the Wifi. This means if you can't attach it to a monitor ofcourse. In my case I only have my laptop at hand and therefore I will configure all via a ssh connection.
Secondly we need to have an Micro SD card which we can flash. For the flashing process we will use a tool called Etcher. And we need ofcourse an image of Raspbian. Please go ahead and download:
- Etcher flashing tool
- The Raspbian image of your choice (in my case I picked the latest Raspbian Stretch image as Buster is giving some issues with Kodi at this time of writing)
Last but not least I expect you to have some knowledge on SSH if you don't have a keyboard and monitor to attach like me. In case you have a monitor and keyboard you can skip all the SSH steps in the next parts of this blog. I wrote a blog on getting the best SSH experience possible on Windows a couple of years ago. Till today I'm still using this setup. In case you still need to setup SSH on your system you can follow this blog.
Prepare your SD card
Now we have downloaded the Raspbian image and Etcher we should start the flashing process. So make sure to first install Etcher on your system. Once installed we can launch Etcher, you can do this by hitting Windows-Key and type balenaEtcher. Now extract the Raspbian image from the Zip. In Etcher you now select the Raspbian image, you select your SD card and you click Flash. A couple of minutes later you will have an almost ready to use SD card for your Raspberry Pi.
Note: Windows might give some popups to Format the SD card. Ignore that, and click Cancel, because this is due to the Linux filesystem as a second partition on the SD card which isn't supported on Windows.
Now in you explorer you will see the following files.
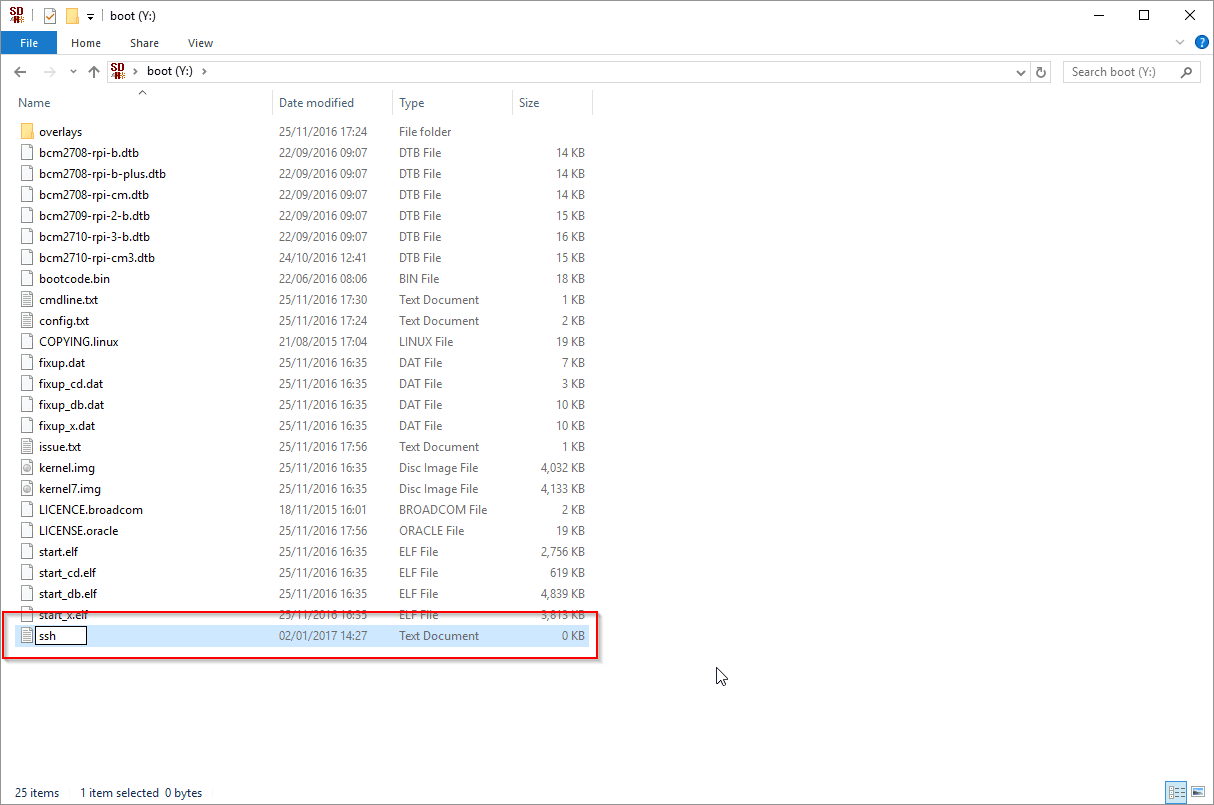
In order for ssh access we need to add a extensionless file (ssh) to this folder as shown in the above image. To create an extensionless file in Windows you will simply name the file as following ssh. (note the pending "dot").
Last but not least I already edit in advance the following boot config settings by editing config.txt. As I will be running Kodi later on I will assign 256MB to of memory to the GPU as this is the minumum for Kodi to properly run. You can skip this if you don't intend to install Kodi or other GUI app.
start_x=true
gpu_mem=256
Now it is time to mount the SD card in your Raspberry. Connect the ethernet cable and attach your Raspberry Pi to a powersupply.
Access your Raspberry Pi via SSH
Now you will go into your Routers admin Panel to figure out the IP address assigned to your Raspberry Pi. Usually you can find this in the DHCP section of your routers admin panel. In following steps I will use the following IP address as an example, 192.168.1.15, please replace that with the IP address your Raspberry Pi got assigned from the DHCP service of your router.
First I want to authorize my SSH key to login on the Raspberry so I can make any next connections without entering a password. If you don't have one, you can skip this step and just enter the password each time you want to connect, or you can create one using the steps explained here.
ssh-copy-id pi@192.168.1.15Now I can login on my Raspberry without password using the following command.
ssh pi@192.168.1.15Upgrade packages
Once we are logged in I first start by upgrading all packages.
sudo apt update && sudo apt upgrade -yConfigure wifi and static IP
Now first thing I do is to ensure my raspberry has a static IP so in the future I don't have to figure out the potential new IP assigned to my Raspberry. To do so I first configure the dhcp service to use a static IP address for my wireless network adapter. We can do this using following script or manually adding the lines to the files using vim or nano.
sudo tee -a /etc/dhcpcd.conf <<EOL
      interface wlan0
      static ip_address=192.168.1.3/24
      static routers=192.168.1.1
      static domain_name_servers=8.8.8.8 8.8.4.4
      EOL > /dev/null
As you can see we are assigning a static IP address 192.168.1.3 and we configured our router and DNS servers using Googles DNS (you can also choose your ISP DNS servers).
Once we are done with this we will configure the Wifi using the wpa_passphrase and wpa_cli commandline utilities. Using wpa_passphrase we can configure the SSID and password for your network which we will write to the config file for this. Then we will reconfigure the wlan0 interface to use these settings.
wpa_passphrase "MyWirelessNetworkSSID" | sudo tee -a /etc/wpa_supplicant/wpa_supplicant.conf > /dev/null
wpa_cli -i wlan0 reconfigure
Once this is done we can verify that the wlan0 network adapter is up and running.
$ ifconfig
eth0: flags=4163<UP,BROADCAST,RUNNING,MULTICAST>  mtu 1500
        inet 192.168.1.15  netmask 255.255.255.0  broadcast 192.168.1.255
        inet6 fe80::4606:9aa4:78e5:11a2  prefixlen 64  scopeid 0x20<link>
        ether b8:27:eb:f3:b2:32  txqueuelen 1000  (Ethernet)
        RX packets 98760  bytes 142662769 (136.0 MiB)
        RX errors 0  dropped 1  overruns 0  frame 0
        TX packets 50845  bytes 4404739 (4.2 MiB)
        TX errors 0  dropped 0 overruns 0  carrier 0  collisions 0

lo: flags=73<UP,LOOPBACK,RUNNING>  mtu 65536
        inet 127.0.0.1  netmask 255.0.0.0
        inet6 ::1  prefixlen 128  scopeid 0x10<host>
        loop  txqueuelen 1000  (Local Loopback)
        RX packets 0  bytes 0 (0.0 B)
        RX errors 0  dropped 0  overruns 0  frame 0
        TX packets 0  bytes 0 (0.0 B)
        TX errors 0  dropped 0 overruns 0  carrier 0  collisions 0

wlan0: flags=4163<UP,BROADCAST,RUNNING,MULTICAST>  mtu 1500
        inet 192.168.1.3  netmask 255.255.255.0  broadcast 192.168.1.255
        inet6 fe80::b7d8:74db:5f86:2c07  prefixlen 64  scopeid 0x20<link>
        ether b8:27:eb:a6:e7:67  txqueuelen 1000  (Ethernet)
        RX packets 4  bytes 510 (510.0 B)
        RX errors 0  dropped 0  overruns 0  frame 0
        TX packets 19  bytes 2649 (2.5 KiB)
        TX errors 0  dropped 0 overruns 0  carrier 0  collisions 0
From now on your ethernet cable isn't required anymore and you can access the Raspberry on the new static IP we configured for the Wireless interface. You can try if all works by exiting the current ssh session by typing exit. Now lets try to access the Shell using our new static IP.
ssh pi@192.178.1.3Reference
This should bring you back in the shell on your Raspberry Pi. So with all of this settled you should be good to continue your own road or wait for a couple of days to have me finish my next blog post in these series where we will have a look at improving the commandline experience, mounting nfs shares and installing Kodi.


